How to Start an iOS App Portfolio

Published on Jan 27th, 2016

Since my post yesterday, the most common question I have received is

“What sort of app should I build for my Portfolio?”

This is an interesting question. Ideally, you would do the same thing you would if you wanted to build an app not for a portfolio. Start by identifying a problem that you feel like you can solve and then solve it in the best way possible. But I can imagine a new developer might not be ready to deal with all the issues surrounding developing an original idea from scratch. That said, my goto response is usually “Make a Twitter app”. Twitter clients are interesting because they will exercise a lot of the skills required to build apps in general. I will list a few of the things I would expect a portfolio quality Twitter app to use (or any portfolio quality app).

It Uses UITableView…

Most iOS apps that I have built have used UITableView in some way or another, it’s probably the most common user interface element in a standard app and being able to demonstrate its usage looks great when applying for a job. This works great for building a Twitter timeline. Try to implement swipes to add actions to your rows and make sure you show proper cell reuse. Look up methods for paging tweets so that when you reach the bottom of the timeline, more cells will load in.

It Uses HTTP API…

There are not many apps for iOS that won’t need some sort of network resource and being able to connect, authenticate and use data from a web service is something you end up doing a lot. Now, I do think you can get away with using the Twitter SDK, but attempting their REST web service would really show you know how to connect to and use HTTP web services.

It Uses Interesting UI…

A lot of customers like their iOS apps to stand out and a Twitter app presents a lot of opportunities to flex your UI building skills and make something interesting and fun to use. Interesting UI can be anything from some sort of custom-built button to a use of graphics and animations to make your app feel fun and alive. Something I like to do is look at some of the more popular apps on the AppStore and try to see if I can duplicate some of the animations and UI elements that they use.

It Uses Persistence and Security…

There is not much you really need to persist in a twitter app except for one important piece, credentials. You will need to show how to store user credentials (or more likely their token) in a secure way. Use of the Keychain API is your friend here and while it’s a bit of a pain to learn, it’s better than leaking user data and putting accounts at risk. Don’t take security lightly

It is relatively simple to build…

A Twitter app doesn’t take a year to build, so you can probably whip one out in a week or two if you can find the time to sit down and code. Portfolio apps don’t need to be big complex pieces of software, iOS tends to work best with simple apps and so it’s perfectly fine to build simple apps for your portfolio. Twitter is just one of the things I like to suggest because it touches so many commonly used parts of iOS. If you are still wanting more, here are a few other ideas to get your gears turning.

  • Notes app ( Demonstrates text manipulation, bonus points for iCloud syncing the notes)
  • Where Did I Park? (An app to mark places on a map and store them for later, demonstrate the use of the location API)
  • Painting App (Demonstrates use of Touch and Graphics API)
  • Alarm Clock (Use local notification and audio playback)

Whatever you decide to build, try to follow some sort of style guide and make your code as clean and easy to read as possible, you will want to to be something you can print out and show to recruiters if need-be.

TL;DR: Build an app that is simple, yet uses as many common iOS features as possible. Make it as pretty as you can, and polish to a shine. Repeat till you have a couple of apps under your belt.

Good Luck!
How to become an entry level iOS developer

Published on Jan 26th, 2016

I have been mentoring some friends who are interested in a career in iOS development, and was asked to come up with some sort of list of what they should know to get started. This seems like a good topic for a blog post, so without (much) further ado, I give you my list of what you should know to become an Entry Level iOS Developer.

Basic CS Knowledge

I don’t believe that being a computer science PHD is a requirement for getting into mobile application development, In my experience, heavy CS concepts don’t often come up in day-to-day work, but a lot of employers still like to run their interviewees through CS puzzles. So, for the novice, I would recommend watching the Harvard CS50 courses on YouTube as a great place to get started, they are easy to follow and actually pretty interesting to watch.

If you are planning to interview with one of the big companies like Google or Apple, you might benefit by picking up a couple algorithm books to study.

Cracking the Coding Interview by Gayle Leekman

The Algorithm Design Manual by Steven S. Skiena

Swift or Objective-C

You don’t have to be an expert, but you should be able to write in at least one of these languages without having to look up syntax very often. Just get yourself to a point where you can write classes, structs, loops, functions, assign variables and evaluate expressions without help.

Right now we are in a strange time where it’s still acceptable to be hired only knowing Objective-C. Swift is pretty new and unless you are applying for a company that has a lot of project turnover, you will mostly be writing in Objective-C anyways. That said, there are plenty of companies taking the plunge to Swift (including the one I work for) and I don’t think it will be too difficult to find a job if it’s the only language you know. The important thing is to be fairly proficient in whichever you choose, and get familiar enough with the other that you can at least read the code.

Frameworks and API

Cocoa Touch is updated yearly and with it things come and go. It is not unusual for me to work with the Apple Documentation open most of the time; there is just too damn much to try to keep in your head.

I don’t think its necessary that you memorize all of the iOS API’s, but you should have a good idea of what is available to you, and be fluent in a few of the big ones.

UIKit (IUViewController, UITableView, UIButton, UINavigationController, GestureRecognizers)

Interface Builder (Storyboards, Segues, and the odd .xib)

Foundation Types (NSArray, NSDictionary, NSString) and their Swift counterparts (Array, Dictionary and String)

HTTP API (NSURLSession, Basic REST API concepts, JSON Parsing with NSJSONSerialization)

Grand Central Dispatch (GCD, NSOperationQueue)

Persistence (NSCoding, NSUserDefaults, CoreData)

Memory Management (what Retain Cycles are and ARC fundamentals)

Third-Party frameworks can also fun, but try to not depend on them too much; if it’s something I can do myself, I usually do.

Development Patterns

Patterns are important, they make development easier and they make your code cleaner. Make sure you understand these basic patterns, they are used A LOT in the iOS Frameworks and it is not likely that you will be able to do much without knowing them. There are many more, but you can learn those as you go.

Delegation (This is sort of the workhorse of most iOS API’s, you should DEFINITELY understand this)

Model View Controller (MVC, I don’t think Apple did the best job of encouraging best MVC separation, but it’s an important pattern that can help improve your code if you take the time to implement it properly. Also, it’s pretty much guaranteed to be on any iOS interviewer’s question list.)

Subclassing or Object-Oriented Programming (The most part you will be writing apps in this style)

Singleton (This one can definitely be abused… use sparingly.)

Familiarity with the Environment

This might seem obvious, but if you don’t have a Mac, get one! If you don’t have an iOS device, get one! While it’s not impossible to get started just writing apps for the simulator, you will eventually want a real device for development. As for computer, it’s gonna be pretty hard to learn Xcode without a mac to run it on. I started out with a 2009 MacBook Pro 13″ and a first-gen iPod Touch. It is quite possible to get by with the lower end devices to start, it was nearly a $1500 investment, but totally worth it in the long run.

UX/UI

All mobile developers should at least know some of the basic concepts of design. You should know the difference between mockups and wireframes and how to use both in your development process. Knowing what Apple considers usable UI will help as well; for this you will definately want to read the Apple Human Interface Guidelines

Tools

You should be familiar with a few of the common development tools.

Xcode (of course)

Source Control (Git, Subversion or Mercurial… probably just git though)

Issue Tracking Software (JIRA is the big one here, but there are others. Just play with some of them if you can.)

Opinions

Having an opinion about iOS, Swift, or even a specific API is a great way for interviewers to understand how deep your knowledge about a topic goes. It also allows us to see your passion. If you are having an interview and you are asked, “So what do you think of Swift?” saying “It’s alright, I guess” is not the correct answer, you should tell them what you think of optionals, how you like using a specific feature. There aren’t many wrong answers here, the important thing is to have something to say.

Portfolio

Actions can speak louder than words. If you really want to nail that interview, put together a couple of simple apps (or even better, launch them on the AppStore); they really like to see that you have the ability to complete a project. GitHub is nice too, but make sure your code is easy for the interviewers to compile if they wanna test it out.

If you are wanting more resources to get started, please checkout my iOS Developer Resources page where I link to blogs and pages I found helpful when I started out.

I guess the last thing I would add is JUST DO IT! Right now iOS developers are in high demand and if you can get yourself to a decent skill level, you won’t be without work for a while. It’s a rewarding job that allows you to practice both engineering skills and creativity.

Did I forget something? Let me know on Twitter (@WestonHanners). I want to make this my go-to resource for helping new developers start their career. by the way the company I work for is hiring iOS Developers of all skill levels, if you are interested, click this link to find out more Y Media Labs Careers Be sure to tell them I sent you ;)

Per-View Auto-Rotation Locking Made Easy for iOS 8 and 9

Published on Nov 10th, 2015

This week I was working on an app where the client wanted to lock the app rotation to Portrait on some screens and Landscape on others. Luckily I had built all of my views in AutoLayout so they already supported the required layouts, I just needed to lock them. Rotation API’s are one of the most frequently deprecated parts of UIKit so when I started working on this, I had to look it up, and let me say, it’s pretty noisy out there. After an hour or so of research and another hour or two of experimentation, I finally boiled it down to two parts.

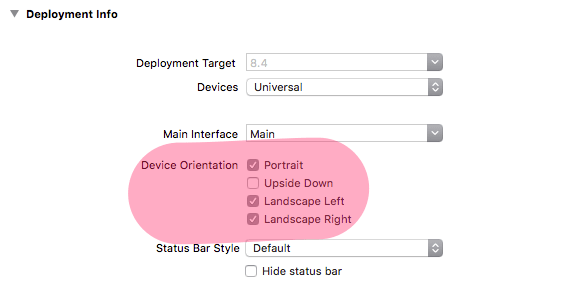
Select ALL POSSIBLE interface orientations you plan to support in your Info.plist.

Screenshot

Then you really only have to implement one method.

Swift 1.2

override func supportedInterfaceOrientations() -> Int {
    return Int(UIInterfaceOrientationMask.Portrait.rawValue)
}

Swift 2.0

override func supportedInterfaceOrientations() -> UIInterfaceOrientationMask {
    return UIInterfaceOrientationMask.Portrait
}

Making sure to select Portrait or Landscape depending on what you want. This is probably one of the messiest API transitions I have seen recently and it took me a while to actually notice what I kept doing wrong in Swift 1.2. (that Int cast is ugly)

Sample Code

If-Let Assignment Operator

Published on Oct 29th, 2015

This article was updated on 12/06/2017 to account for Swift 4

How many times have you had to implement this pattern?

if let value = someOptionalValue as? String {
    self.value = value
}

I use this all the time when parsing through JSON or implementing NSCoding and I think its a little over verbose for Swift, I felt sure there was a better way. NSHipster mentions a logical OR assignment operator (||=) which would be perfect however, it doesn’t seem to be implemented for generics (Please let me know if I am wrong here). I thought I would give it a try…

precedencegroup AssignmentPrecedence {
    associativity: right
}

infix operator ?= : AssignmentPrecedence

func ?=<T>(left: inout T, right: T?) {
    if let value = right {
        left = value
    }
}

It actually worked quite well, I was able to reduce the original code to this

self.value ?= someOptionalValue as? String

Might not be the biggest win, but when you have several of these assignments in a row, it saves a lot of code and makes it much more readable. One more thing… and I am still trying to figure out exactly what is going on here, but I ended up having to define a second function to assign to optionals. The only difference is the left parameter now is T?

func ?=<T>(left: inout T?, right: T?) {
    if let value = right {
        left = value
    }
}

var someOptionalString: String?

someOptionalString ?= newValue // Will assign when newValue is not optional

If you are interested in seeing this in action, here is the Playground

Inheriting Equatable in Swift

Published on Aug 25th, 2015

Today, I was working on creating some Swift objects that needed to conform to the Equatable protocol. Generally this is quite easy as you just implement the == function for the class.

func ==(rhs: , lhs: ) -> Bool {
    return 
}

The issue is these functions are required to be global (that’s the way operator declarations work in Swift), so there is no easy way to inherit your equality from super classes. Here is an incredibly contrived example:

class Person: Equatable {
    var name: String = ""
}

class Employee: Person {
    var position: String = ""
}

func ==(lhs: Person, rhs: Person) -> Bool {
    return lhs.name == rhs.name
}

func ==(lhs: Employee, rhs: Employee) -> Bool {
    return lhs.name == rhs.name && lhs.postion == rhs.position
}

Say we want to implement Equatable for both of these classes. We will want Equatable for Person objects to mean they have the same name (this is really all we have in this class, but pretend it was more complicated). Employees can have the same name, but their equality will also depend on their position (manager, worker, owner, etc..). We don’t want to have to reimplement the Person == functionality in our subclass, usually you would want to call to super, but since Swift operators are global, you have no sense of super. The solution is actually quite simple when you think about it. You want to move the Equatable logic into the classes where they can call to super. Just have your == function call into equalTo() on your instances, you can create it like this.

func ==(lhs: Person, rhs: Person) -> Bool {
    return lhs.equalTo(rhs)
}

func equalTo(person: Person) -> Bool {
    return self.name == person.name
}

Now you can then easily call the equalTo() function in your parent class. Here is the the completed solution, and Playground.

func ==(lhs: Person, rhs: Person) -> Bool {
    return equalTo(rhs)
}

func ==(lhs: Employee, rhs: Employee) -> Bool {
    return lhs.equalTo(rhs)
}

class Person: Equatable {

    var name: String = "Bob"

    func equalTo(person: Person) -> Bool {
        return self.name == person.name
    }
}

class Employee: Person {

    var position: String = "Manager"

    func equalTo(person: Employee) -> Bool {
        var match = super.equalTo(person)
        match = match && self.position == person.position
        return match
    }
}

This was tested on Swift 1.2

UPDATE 11/6/2015: Creating an isEqual function on NSObject subclasses was causing issues, changing to equalTo() fixes this.